Lithium batteries are volatile. Failure to read and follow these instructions may result in fire, personal injury and damage to property if charged or used improperly. Always handle your device and batteries with care – never drop the batteries or device. Fully charge your Arizer Solo III v2.0 before first use. Arizer Solo III v2.0 Batteries and Chargers are manufactured to strict quality standards, specifically for use with the Solo III v2.0. Only use official Solo III v2.0 Batteries & Chargers. Do not use any third-party, counterfeit, or unknown brand batteries or chargers. Lithium batteries can explode or cause a fire if they are used incorrectly, if they are damaged, defective, or tampered with. Do not tamper with or misuse the Arizer Solo III v2.0 Battery, and do not use damaged/defective batteries or Solo III v2.0 devices. Arizer Solo III v2.0 should be stored in a safe, temperature controlled, cool, dry place. Do not store in extreme temperature environments. Extreme heat or cold can damage the device and/or battery. Do not store your Solo III v2.0 with a fully charged or fully drained battery for extended periods of time (one month or longer). If storing for long periods, store with the battery at 50% capacity. Never throw away the Solo III v2.0 or Solo III v2.0 Batteries, and never put Solo III v2.0 Batteries in a battery collection box. If you have dropped the device or notice physical damage you should take the following steps: Place the device in a safe, dry place and leave it for at least one hour in case there is a short circuit and the battery starts heating up. Check to see if the device has become hot. If so, leave the device until it has cooled off, and then dispose according to local laws and regulations. Battery Performance – Arizer Batteries meet rigorous quality standards. With normal use they will last for hundreds of charge cycles before losing any capacity. Dropping the battery or the unit can result in battery damage that may limit / reduce the battery capacity quickly, so it is important to handle your unit carefully. Battery Charge – Depending on the temperature setting and general usage patterns, the Solo III v2.0 battery will typically last for 3 hours of use per charge. The battery will take 3 hours to fully charge, or longer if you use it while charging. Use While Charging – If your battery is running low with the Solo III v2.0, you don’t have to wait for the battery to fully charge before you can use it. Just partially charge the battery (5-10 minutes) and then you can set the temperature and use the Solo III v2.0 while the battery continues charging. Note: The Solo III v2.0 will not operate if the battery is completely drained. Battery Conservation – Charge the battery as necessary. The Solo III v2.0 and Solo III v2.0 Chargers have built-in protections to prevent the battery from being overcharged or drained too low. To conserve battery life, use the Solo III v2.0 in a temperature-controlled environment and use lower temperature settings. When outdoors, stay sheltered from the elements and avoid using in extremely cold temperatures. Battery Replacement – The Solo III v2.0 Battery is a high-capacity, long life battery, and will last for a long time, even with prolonged / regular use. The Solo III v2.0 Battery is covered under a limited 1-Year warranty and replacement service is available upon request. To inquire about replacing your Solo III v2.0 Battery send us an email to: service@arizer.com. Safety Disclaimer – The Solo III v2.0 Battery is not user-replaceable. Arizer Batteries should not be substituted with third-party batteries — Only official Solo III v2.0 Batteries should be used with the Arizer Solo III v2.0. We cannot verify the quality or safety of other batteries, and using third-party batteries can result in personal injury, electric shock, and damage to the device which is not covered under warranty.
The Control Panel consists of a large vibrant Display Screen, and a Control Ring containing a center (M) button, and an outer ring with Up, Down, Left & Right Arrows.
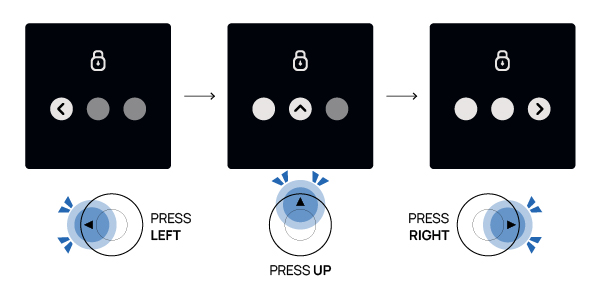
Powering ON/Lock Screen
PRESS AND HOLD the center M button for 3 seconds. Once the lock appears, press LEFT then UP then RIGHT in sequence to unlock your Solo III v2.0. A password hint can be found etched on the bottom of your Solo III v2.0.
Powering OFF
To power Off, press the M button until you see the “Bye” screen.
Control Buttons
M Button
PRESS – Select (Settings/ Mode Select/ Presets)
DOUBLE PRESS – Preset Selection
HOLD – Power ON/OFF
UP Button
PRESS – Increase Temp. by 1°(Session Mode), Heat(On Demand Mode), Up(Settings/ Mode Select/ Presets)
HOLD – Increase Temp. by 10°(Session Mode)
DOWN Button
PRESS – Decrease Temp. by 1°(Session Mode), Cancel Heat(On Demand Mode), Down(Settings/Mode Select/Presets)
HOLD – Decrease Temp. by 10°(Session Mode)
RIGHT Button
PRESS – Right (Settings/ Presets)
DOUBLE PRESS – Next (Preset/Heat Level)
HOLD – Settings
LEFT Button
PRESS – Left (Settings/ Presets)
DOUBLE PRESS – Previous (Preset/Heat Level)
HOLD – Mode Select
Mode Selection
Press UP or DOWN and press the M button to select either Session Mode or On Demand Mode. You can easily switch modes at any time by holding the LEFT button.
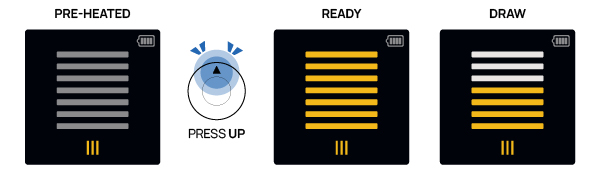
In Session Mode your Solo III v2.0 will begin heating automatically. While in On Demand Mode press UP to begin heating.

Sit back, relax, and enjoy a velvety, smooth and tasty vapor session.
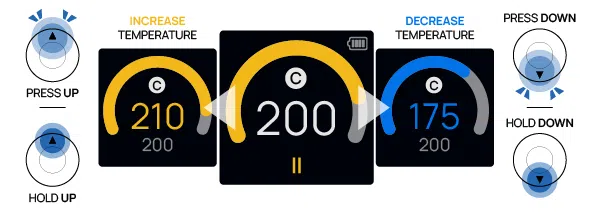
To adjust the temperature PRESS for 1° increments or HOLD for 10° increments: UP to increase temperature or DOWN to decrease temperature.
Session Mode – Presets
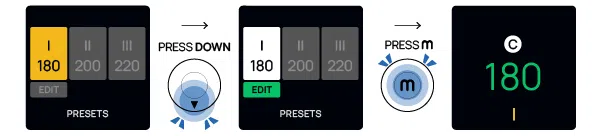
Double pressing the M button will take you to the preset selection screen. Use the LEFT and RIGHT buttons to navigate your presets and press the M button to make a selection. Your Solo III v2.0 will then heat or cool to the selected preset temperature. Your presets can be adjusted by selecting the EDIT button found below the preset you would like to adjust. To conveniently switch between presets, quickly double press LEFT or RIGHT.
Take quick direct hits or massive rips through your favorite bubbler.
In On Demand Mode, press UP to begin heating to the current preset temperature. When all bars are yellow your device is heated and ready to draw. To cancel heating, press DOWN. As the bars turn from yellow to white this represents your heat time, the time your Solo III v2.0 remains at your preset temperature. Default heat time is 10 seconds which can be easily changed by editing your presets. When bars begin to change from white to grey this represents the cooldown time. During the cooldown time you are still able to enjoy your session until all bars turn grey and your device is no longer producing vapor.
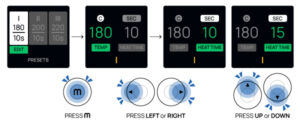
On Demand Mode – Presets
Double press LEFT or RIGHT to switch your Preset at any time. Double Pressing the M button will take you to the preset selection screen. Use the LEFT and RIGHT buttons to navigate through your Presets and press M to make a selection. Your presets can be adjusted by selecting the EDIT button found below. Once in the EDIT screen use LEFT/RIGHT to switch between TEMP and HEAT TIME and UP/DOWN to adjust.
Toggle Session
To enter Session Toggle press the M button while your Solo III v2.0 is in use. Press UP/DOWN arrows to highlight the +5 MIN button and press the M button to add 5 minutes to your session. Adding time to your session will not affect your Auto-Off setting for future sessions. Auto-Off can be adjusted in your Solo III v2.0 settings.
HOLD the RIGHT button to access the settings. The settings are saved independently for each Mode. Use the LEFT and RIGHT buttons to navigate to your desired setting category and use the M button to select the setting you would like to change. Once a category has been selected, use the UP and Down buttons to change the setting and PRESS the M button to confirm your change. Use the < BACK button to exit the settings.
UNITS
The Solo III v2.0 display can be set to Celsius or Fahrenheit.
NOTIFICATIONS
ALL – The device beeps once for every button press, and beeps twice when Set Temperature is reached.
TEMPERATURE – The device beeps twice when Set Temperature is reached.
OFF – Silence. No beeps.
TEMPERATURE – The device beeps twice when Set Temperature is reached.
OFF – Silence. No beeps.
VOLUME
Adjust the volume of the NOTIFICATION beeps between LOW, MEDIUM and HIGH.
BRIGHTNESS
Adjust the display brightness between LOW, MEDIUM, and HIGH.
INVERSION
Turn On or Off the Control & Display Inversion feature.
LOCK
Turn On or Off the Solo III v2.0 Lock feature.
AUTO-OFF
The automatic shut-off timer safety feature ensures you don’t forget to turn off the unit and helps conserve battery life. Use LEFT and RIGHT to switch between Session Mode and On Demand Mode and UP and DOWN to adjust Auto-Off time. Session Mode can be set between 5–20 minutes in 1 minute increments while On Demand Mode can be set between 5-60 minutes in 5/10 minute increments. The automatic shut-off timer safety feature ensures you don’t forget to turn off the unit and helps conserve battery life. Adjust the shut-off timer between 5–20 minutes in 1 minute increments.
Put some coarsely ground botanicals in a small container then gently push and slightly twist the glass stem into the container to fill the dish. Do not press too hard or pack too tightly. Loading the Glass Aroma Tube this way takes advantage of its design ensuring easy maintenance and optimal performance. Alternatively, you can load the chamber with pre-ground botanicals or small buds with your fingers. For optimal convection heating and pure vapor, lightly tamp down the botanicals leaving a slight gap (1-2 mm).
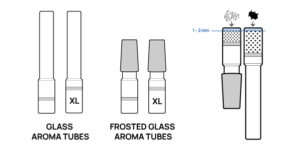
Connect to your water pipe or bubbler using the included Frosted Glass Aroma Tube. When the Solo III v2.0 is turned upside down with the Inversion setting turned ON, the display and controls automatically invert for convenient operation.
A full range of parts and accessories to equip and protect your Solo III v2.0 are available for purchase here. If you can’t find the part you need send an email to: service@arizer.com with a description of the part you need.
The Solo III v2.0 is compact, lightweight, and completely portable, conveniently fitting in the palm of your hand, pocket, or purse.
Weight: 280 grams
Length: 49 mm
Width: 32 mm
Height: 130 mm
Equipped for worldwide use with an input capacity of 110-240V and international safety certifications.
The Solo III v2.0 carries a lifetime warranty on the heating element, a limited 2-Year warranty covering defects in materials or workmanship, and a limited 1-Year warranty covering the battery. Glass is not covered under warranty. Retain proof of purchase for warranty service. Returning the product and costs incurred are the responsibility of the user. Arizer will repair or replace warrantied items at our discretion. The warranty does not cover units damaged by dropping, tampering, unauthorized service performed or attempted, modifying the unit, misuse or abuse. Troubleshooting If you experience an issue with your Solo III v2.0 send an email to service@arizer.com and an expert Arizer customer service representative will reply as soon as possible to troubleshoot and determine the best way to resolve any issues. To help expedite your service request please include a description of the problem, your full name, your shipping address, the serial number on the bottom of your device, and a copy of your sales receipt.
Cautions, Disclaimers & Warnings(Read before use)
First Time Use – Examine box contents to ensure all included parts are in good condition, not damaged from shipping. Check glass parts for cracks or breakage. Packaging materials, bags, & small parts may pose a choking hazard. Keep out of reach/use from children, minors and pets. Glass Aroma Tubes may fit tightly in the unit at first. If you are finding it difficult to insert a Glass Aroma Tube, turn on the Solo III v2.0, set the temperature to 200° C, and let the unit heat for 1-2 minutes then try again. To burn off any residues from packaging, turn on the unit, set the temperature to 220° C, and let the unit heat for 5 – 10 minutes. Warning – Hot Parts – Handle hot parts and glass parts with care. Do not place hot parts on non-heat safe surfaces. Carefully attach protective heat-rated silicone caps to safely cover the hot end of glass parts. Allow the heating unit and hot parts to cool before placing them in the purse, pocket, or any container where damage from hot parts can occur. Parts are made from strong scientific quality borosilicate glass, but all borosilicate glass is breakable so handle with care and caution. Avoid tapping on hard surfaces to prevent cracking and breaking. If glass is dropped or sustains an impact, examine for cracking, chipping and weakness before use. Do not expose hot glass parts to cold water or extreme temperature change as this may result in cracking/breaking. Product contains electrical and delicate parts — do not drop. If damaged do not operate. To protect/prevent against electric shock/fire, never immerse or operate the product in or around any water/liquids. Do not stick or pour anything in the unit or place near flammable material. Do not store/operate/expose the unit and contents to extreme temperatures. Do not open the unit – doing so may cause electric shock and voids warranty. Do not leave the unit turned on and left unattended. The information contained in this manual is an aid in understanding the various theories and practices, preparation and uses, and does not represent an endorsement or guarantee the efficacy or use of its preparation. This information is not intended in any way to replace or supersede professional consultations. The information contained herein is for instructional and cautionary purposes only. In no way is the information contained herein intended to be a medical or prescriptive guide or to be used for diagnosing or treating a health problem, condition or disease. It is the user’s responsibility to consult a Physician or Medical Professional. This product is not licensed as a medical device, use unit only for its intended use.
Safety Certifications
Equipped for worldwide use with an input capacity of 110-240V and international safety certifications.
Limitation of Liability (Read before use)
Failure to read or follow instructions, improper or careless use may lead to personal injury. Arizer and affiliated companies will not assume any liability for injury or damage resulting from the use or misuse of this device. Due to the fragility and nature of glass Arizer and affiliated companies are not responsible for cuts or injuries sustained from breakage. Arizer and affiliated companies are not liable for injuries or burns associated from touching hot parts. Arizer and affiliated companies are not liable for failures to comply with these warnings and safety guidelines. By purchasing this product the buyer assumes all risks associated with lithium batteries. If you do not agree with these conditions, return the product immediately before use. This product is intended for use with the botanicals described herein — Arizer and affiliated companies are not liable for use with other than those botanicals described herein. Company’s liabilities for damages in connection with the product and its parts shall not exceed the purchase price of the product. IMPORTANT Obey local laws. Not all essential oils, botanicals and herbs are legal for use in every Country or State. Check your Local, State, Federal and Importation laws before ordering botanicals.This device is meant for legal use only.
If you experience an issue with your Solo III v2.0 send an email to service@arizer.com and an expert Arizer customer service representative will reply as soon as possible to troubleshoot and determine the best way to resolve any issues. To help expedite your service request please include a description of the problem, your full name, your shipping address, the serial number on the bottom of your device, and a copy of your sales receipt.
For more information and support visit www.arizer.com/support or send an email to service@arizer.com. Designed in Canada. Made in China. ©2024 Arizer. All rights reserved. Arizer, the Arizer logos, and Solo III v2.0 are trademarks or registered trademarks of Arizer in Canada, USA, Europe, Asia and other jurisdictions.
For more information and support visit www.arizer.com/support or send an email to service@arizer.com
The Solo III v2.0 itself is essentially maintenance free so you can spend your time using it instead of cleaning it! Simply recharge the battery when it is low, swap out pre-loaded Glass Aroma Tubes on the go without fiddling with emptying or cleaning bowls, and periodically clean your Glass Aroma Tubes for optimal flavor and performance. To clean the glass parts, soak them in isopropyl (rubbing) alcohol for a couple hours then rinse with hot water. In most cases doing this will clean the Glass Aroma Tubes as good as new. Repeat as necessary. After cleaning, always ensure the Glass Aroma Tubes are fully dry before use.